Using Linux to share your High-end Workstation
Home |
Science and Software
The majority of modern scientific instruments is controlled by computers, either
embedded or connected through some kind of interface. Especially "high-end"
equipment like mass spectrometers or nuclear magnetic resonance instrumentation
is controlled using operating systems like Unix or OpenVMS, which are known
for their stability and real-time multitasking capabilities.
Due to the permanent
use of expensive instruments, there is a need to access data even if the instrument's
workstation is occupied by an operator. The "traditional" approach to process
data on another computer (or even to control the instrument) would be to buy
another expensive high-end workstation with the same expensive software and
to use it for off-line processing. However, this is rarely cost-effective.
A much simpler way is to use a "cheap" computer system and to redirect the
display of the workstation to that computer. This is easily possible as all
of the systems mentioned above make use of the X-Window system to interact with
the user. X-Windows is completely different from the known Microsoft Windows
environment in many aspects, one of the most interesting being that input and
output can be redirected to another computer. This can be used in so-called
"terminal emulation" programs, where the display from an X-Windows application
is displayed in a browser; however, these emulators are often a costly piece
of software and require a fairly powerful computer to run.
In contrast to this, any standard, low-end Personal Computer (PC) can be run
under Linux. Linux is a freely available operating system and features the X-Windows
system as its standard display. This text describes a simple approach that has
been used with success in the author's laboratory.
The X Server
Every "X Server" has a display name of the form:
hostname:displaynumber.screennumber
The hostname specifies the name of the machine to which the display is physically
connected. The hostname can be omitted and in this case, the server on the
same machine will be chosen - in fact, if you are the only one using X on your
computer, you will want to just leave this off of your display specifications.
The displaynumber is probably zero, this is used if the X Server is controlling
more than one keyboard and monitor unit, for instance, a network of X terminals.
The screennumber specifies which monitor in a multiple monitor setup should
be used [1].
In this configuration, all the actual processing is performed on the workstation,
and only the display (that is, screen, keyboard and mouse) are redirected to
the computer running Linux. Thus, is is not required that the Linux PC
be a powerful PC; a convenient., large display is sufficient. In the same context,
it is not required to recompile any software for use under Linux as the
processes are indeed running on another computer.
Experimental
The experiments described below were initially carried out using an old, "technically
outdated" 75-MHz Pentium PC (Digital 575) running SuSE Linux 6.3. The application
servers were a Digital AlphaStation 4/100 running Digital UNIX 4.2c and the
application software package Finnigan ICIS2 Version 8.3, as well as Micromass
OPUS under OpenVMS.
While the procedures described below should work ad hoc, it is recommended
to create a second, separate user account for the data system to avoid interference
with the data system version that is currently running on the workstation itself.
We assume that the ICIS2 package is installed on a workstation named alpha.
The login shell for alpha is csh, which is the default Finnigan installation.
We want to access the workstation from our "local" computer, a Linux PC called
linuxbox. On linuxbox, type in a terminal window:
xhost alpha
You should get a message telling you that alpha is being added to the
access control list. Now, use ssh, telnet, rlogin or
whatever program you like to log in to the server:
telnet alpha
After login, redirect the display to your local computer:
setenv DISPLAY linuxbox:0.0
This requires that the IP address of linuxbox is known on alpha and vice versa.
If no entry in /etc/hosts is provided (e.g. DHCP), it is also possible
to specify the IP address directly:
setenv DISPLAY 192.168.111.111:0.0
Now you are ready to launch your application:
exec_icis &
The display will appear a few seconds later on your local Linux workstation.
Note that applications should be launched in the background and that it is
not recommended to launch a "daughter" application (CHRO, SPEC, ...) directly:
In the case of Finnigan's ICIS2, all colour settings are controlled via the
ICIS Executive, so that launching CHRO directly may lead to strange or unusable
colour settings.
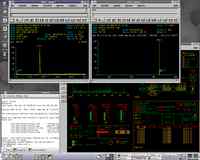
Here is a screenshot, displaying Finnigan's ICIS software on Linux' KDE2 desktop.
Click on the image to see the full-size version (resolution 1280x1024, 144 kB).
We assume that the OPUS software is installed on an OpenVMS workstation
called opus. We want to access the workstation from our "local"
computer, a Linux PC called linuxbox.
On linuxbox, type in a terminal window:
xhost opus
You should get a message telling you that opus is being added to the
access control list. Now, use ssh, telnet, rlogin or
whatever program you like to log in to the server:
telnet alpha
When you have logged in, set a few variables, redirect the
display to your local computer and create a DECterminal:
set sys$workstation decw$display
set display/create/node=192.168.111.111/transport=tcpip
create /term/detach
The upcoming terminal should show the message on launching OPUS:
opus
The OPUS display will appear a few seconds later on your local Linux workstation.
Note that all colour settings are controlled via OPUS; we have experienced one
case where a server crash on OPUS lead to unusable colour settings. The problem
was cleared after a reboot of the OpenVMS system.
Note that xhost is not a very secure method to establish connections. It should
be used only in protected environments, i.e. if you are behind a firewall and
you trust your colleagues on the other terminals. For an in-depth discussion,
refer to [2].
In case of doubt, as soon as your X client has made its connection and displays
a window, you may want to revoke permissions for more connections with:
xhost -alpha
Another, more straightforward solution is to use ssh, which also supports
X forwarding. If you are looking for an ssh client and an X Server for Microsoft Windows,
there is some information on my Windows page.
In terms of licensing, most license contracts allow to run the original software
on only one machine. However, this is not an obstacle as the software
as such runs only on the host computer; is is the display that is redirected
to another computer. Thus, this procedure should not violate most common license
contracts.
Special Thanks for help with the individual configurations go to Jürgen Schmädecke
from Finnigan, Bremen (ICIS system) and to Paul Darnley from Micromass, Manchester (OPUS
system).
References
[]
Ray Brigleb. The X Window User HOWTO, v2.0, 1999-09-01.
[]
Vincent Zweije. Remote X Apps mini-HOWTO, 1998-07-14.
(See also this page).
This text is copyrighted by Jörg Hau. All rights reserved. The information and
opinions contained on this Website is provided without warranty of any kind,
neither expressed nor implied. Although I make reasonable efforts that the information
provided here is correct, I do not guarantee that it is accurate, reliable or
complete. All trademarks or similar items on this web site are the property
of their respective owners and are used for identification purposes only. Their
use does not imply any recommendation, invitation to buy a specific product,
or similar.
This article was first published on 2001-03-09 and the content was last revised on 2004-09-10.

